»   Aufbau --> Assembly Guide K2, K4 

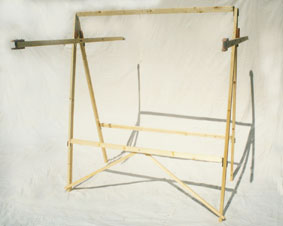
Assembling the Market stall K2, K4…

Skizze K2 
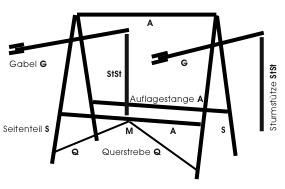
Sketch Assembling K2
klipklap K2
Parts Stall K2

(+ further sections K4, K6 ...)

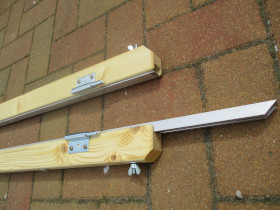
2 Side parts (Seitenteile) S
- with Diagonal supports in front - Q
2 Gabeln G (horizontal holders)
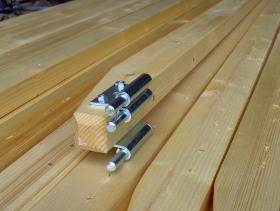
3 Auflagestangen (Pins) A - one of it with screw nut M8 - M
& butterfly screw M8 x 80 -
2 Storm-props (Sturmstützen) r./l. St
4 Counter boards (Auflagebretter)
1 Tarpaulin (Plane) - 2 + 1 crossbars inside

Short version

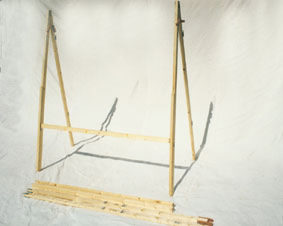
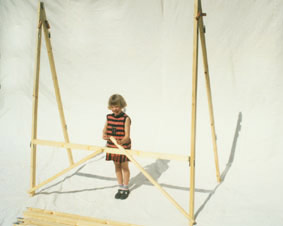
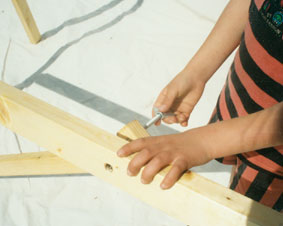
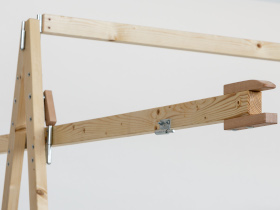
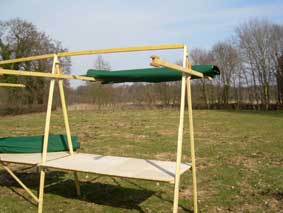
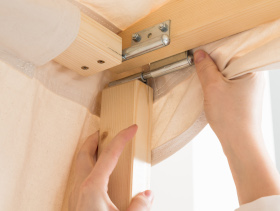
1. Start with the pack of 3 Auflagestangen A (horizontal pins), unscrew and select the one with the screw nut M in it, fit it to one of the Seitenteile S (side parts) - see Pic1 -Diagonal supports Q on S face to the front. Fit the second S to opposite side of A as Pic 2. Take both Q to the middle of A (screw nut! M) and fix it from the inside with the butterfly screw. Plug in the two other A in rear and top. (to reach the top you can knee/step on both A near S).

K2 alleine aufbauen
- use A to support S …
K2 aufbauen
- lift A carefully, plug in second S …
You can do it without help of a second person!
K2 Querstreben
screw both  Q with …
K2 nur eine Schraube
M in the middle from the inside!

2. Plug in Gabel G to S by opening it till it fits to the hinges - see Pic 5. and secure it by turning the wooden locking bolts tight. Both Gabeln G fit to the right side of the side parts S! - no symmetry! - see Pic 7.
Gabel in Seitenteil
fit in G and lock;
K2 Gestell
stand 2m left o. r. extendable;

- Stalls with two sections (from 3m ) have a middle Gabel G with three hinges at the back side: 2x for Canvas-pins, 1x for storm prop St in the middle - see Pic 8.
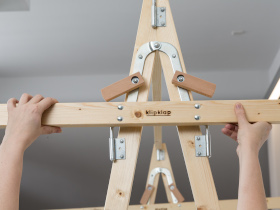
- All G fit to the right side of S - no symmetry! - no left or right parts!

Gabel rechts
All G fit to the right side of S!
K2 Gabeln mittig 3x Scharnier
middle G of K4: 3 hinges at back;

3. Four Counter boards for each section fit between A. If the front of the boards look zig-zag the stall stands un-angular. Pull on leg of a Seitenteil S to line up angulary.

K2 aufplanen
Canvas roll on back of both G …
K2 aufplanen
- roll down and plug in pin to G …

4. Put the canvas roll on both Gabel G from back side (hands free & no weight to support!)- as Pic 9., then roll down the back wall part (and a bit more) till the inner wooden pin is visible. Plug in this pin to the back side hinges of G - see Pic 10. Unroll more canvas of the roof part afterwards - as Pic 11 and throw the rest roll over the top to the front - see Pic 12.

K2 Plane
- roll out roof part
K2 Plane
- throw roll over the top to front …
K2 Plane
tighten!
Plane spannen
Canvas tighten:
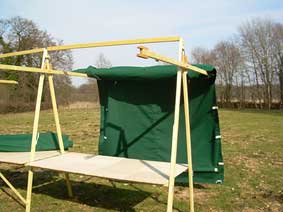
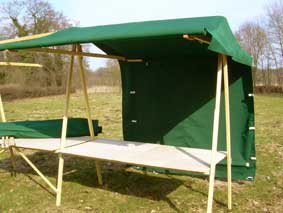
Turn in, - Brace, - Pin!

Plane spannen

Important:

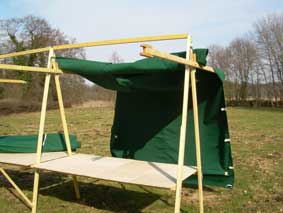
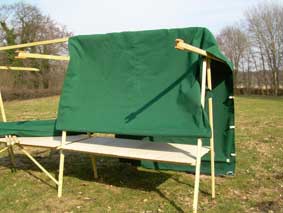
Tighten the canvas, so no water can collect on top! - Turn in, Brace, Pin! 
- especially important for colored tarpaulins from stiff artificial material!
The tarpaulin has to be rolled in till the front pin fits strong into the Gabel G.
When the tarpaulin is rolled out the pin inside can be adjusted so that - when rolled in - the canvas fits tight.
The tarpaulins of further sections of the market stall can be pinned on overlapping in middle G.

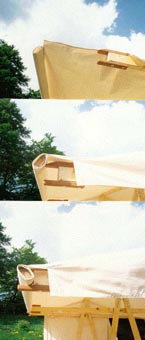
Zipfel stall: Now put in the support ("Rakete") in the cone of the canvas and erect it on top A (- you can knee on the table near sides of S for help, max. point load ca. 75 kg).

Planen zusammen spannen
Pins in front of K4-canvases are
flattened and overlapping in G .
 
2m anhängen
extend K2 to K4, canvases overlapping

5. Plug in left & right Storm-prop St first down in to back wall of the tarpaulin, then up in the hinges at the back of G by pushing it down to straighten the back. Adjust the Storm-props and lock aluminum tip with screw. (K4: middle St with double hinges). This hinges can be adjusted in height if necessary after the newly canvas has been wet and dried several times.
Gabel rechts
St plug in first down then above at G
Sturmstützen
Hinges on St are set left / right

Skizze K3
K3 Stand -  2 sections á 1,5m
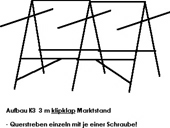
  linked to 3m (shortened K4):
diagonal supports Q fixed separately, 2x M!
Halter für Standblende
G with plug in hinge for displays:
Pin may not stand out of G!

6. Side cover fit left or right! Front cover are fixed with Velcro strips overlapping on side covers. Then the side covers are fitted with Velcro strips on the outside (Extra!) - and then they are determined for left and right side. If needed we can sew on the Velcro strips later, send it in.

7. For transport screw the three Auflagestangen A to a pack so the butterfly screw (in M) can not get lost.

8. Always dry the canvas and store it dry! Never use the PVC-Transportbag for the canvas!

It is all easy but if you have any questions please call:
0049 339 28 23 98 90 or mobile 0049 179 54 212 55 - post@klipklap.de

--------------------------------------------

--- >     You can print this Assembly guide K2  PDF ca. 1.4 MB!
- (smaller version: PDF ca. 200 kB)

---> Assembling K2: see the film (ca. 8 minutes)

-  Special indoor stall D1.2  (PDF ca. 100 KB)  -

Measurements

height                                              230 cm
roof covert stall depth                 240 cm
free walk space                            200 cm
counter height                               75 cm
counter depth                               100 cm
space behind counter                  80 cm
space in front of counter             60 cm
  (covered for costumer)

wood strength                              3,2 x 5,2 cm
table (in 4 parts 50 x 100 cm)    200 x 100 cm 
bearing load of table                not less than 80 kg

packaging structure K2        approx. 240 x 30 x 20 cm
                    table parts                          100 x 50 x 5 cm
weight K2 2m with tarpaulin             approx. 40 kg   
weight K4 4m with tarpaulin             approx. 75 kg

Accessory:

Transportbag for Market Stand Transport bag for structure market stall K2 - K4

FAQ

1.) How can I clean the canvas?

Once dried, the canvas maybe brushed off to remove dust and soil. Water without soap will help to remove deeper stains in the fabric (using carefully a high pressure cleaner if available). Chemical cleaning products should not be used, as they will damage the waterproofing of the canvas. As a result, some discolouration may remain after cleaning, which can only be prevented by save handling during transport and set up (always use supplied bag). Some darkening in colour due to ageing is normal, but maybe counteracted by long sun exposure, which may also bleach out discolourations.
Professional chemical cleaning and subsequent waterproofing is not recommended. Experience has shown that the new waterproofing is not satisfactory, is often as expensive as half the price of the new canvas, and the canvas may shrink as a result. Preventing stains is often your best, easiest and cheapest option to care for the canvas, which is undoubtedly the most important (and most expensive) part of the stall.

Find more FAQ in German version.